rabbitmq-安装和集群部署


1、什么是消息中间件

利用可靠的消息传递机制进行与平台无关的数据交流,并基于数据通信来进行分布式系统的集成。通过提供消息传递和消息排队模型,他可以在分布式环境下扩展进程间通信。

应用程序之间异步通信


2、消息中间件的作用

异步

解耦

削峰

冗余


3、JMS协议

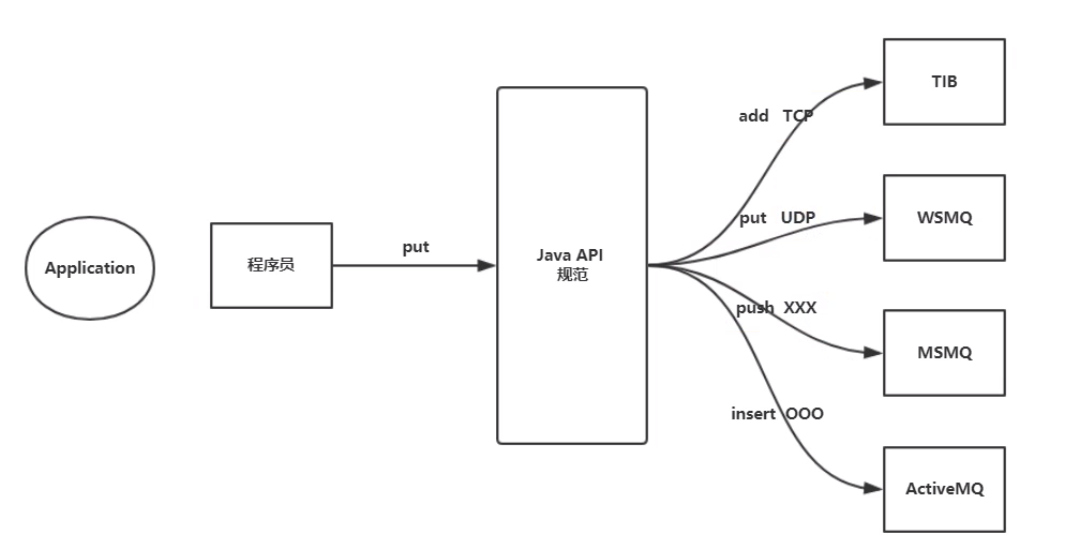
JavaMessageService sun 01年发布的 规范,用来统一所有的mq规范,提供了一个JavaAPI

AMQP协议 04年出现的

单播

广播


4、AMQP协议

AMQP包含如下几个组件

  • 生产者
  • 消费者
  • 消息:有效载荷与标签
  • 连接、信道:一个tcp连接里有多个信道,节省资源
  • 交换器、队列、路由键、绑定: 交换器和队列通过路由键来绑定


5、RabbitMQ简介

RabbitMQ的一些特性:

  • 消息确认机制

  • 队列、消息持久化

  • 消息拒收

  • 默认交换器 mandatory(防止丢失)

官方文档:https://www.rabbitmq.com/documentation.html


6、Centos7下RabbitMQ安装

安装指南:https://www.rabbitmq.com/install-rpm.html

6.1、安装Erlang

版本选择:https://www.rabbitmq.com/which-erlang.html

下载地址:https://github.com/rabbitmq/erlang-rpm/releases

选择:rabbitmq官方维护的专为rabbitmq准备的erlang版本

vi /etc/yum.repos.d/rabbitmq_erlang.repo写入:

1
2
3
4
5
6
7
[rabbitmq-erlang]
name=rabbitmq-erlang
baseurl=https://dl.bintray.com/rabbitmq-erlang/rpm/erlang/22/el/7
gpgcheck=1
gpgkey=https://dl.bintray.com/rabbitmq/Keys/rabbitmq-release-signing-key.asc
repo_gpgcheck=0
enabled=1

安装:yum install erlang -y


6.2、安装RabbitMQ

官网:https://github.com/rabbitmq/rabbitmq-server/releases

1
2
3
rpm --import https://github.com/rabbitmq/signing-keys/releases/download/2.0/rabbitmq-release-signing-key.asc

vi /etc/yum.repos.d/rabbitmq.repo
1
2
3
4
5
6
[bintray-rabbitmq-server]
name=bintray-rabbitmq-rpm
baseurl=https://dl.bintray.com/rabbitmq/rpm/rabbitmq-server/v3.7.x/el/7/
gpgcheck=0
repo_gpgcheck=0
enabled=1

安装

1
yum install -y rabbitmq-server

6.3、开机启动RabbitMQ

1
chkconfig rabbitmq-server on

6.4、启动运行

1
2
3
4
5
6
7
8
9
/sbin/service rabbitmq-server start
# 默认会以用户rabbitmq运行,注意日志目录等写权限
# /var/lib/rabbitmq -> .erlang.cookie
# /var/log/rabbitmq

/sbin/service rabbitmq-server stop

ps aux | grep rabbitmq
netstat -nltp

6.5、防火墙设置

  • 4369: epmd, a peer discovery service used by RabbitMQ nodes and CLI tools
  • 5672, 5671: used by AMQP 0-9-1 and 1.0 clients without and with TLS
  • 25672: used for inter-node and CLI tools communication (Erlang distribution server port) and is allocated from a dynamic range (limited to a single port by default, computed as AMQP port + 20000). Unless external connections on these ports are really necessary (e.g. the cluster uses federation or CLI tools are used on machines outside the subnet), these ports should not be publicly exposed. See networking guide for details.
  • 35672-35682: used by CLI tools (Erlang distribution client ports) for communication with nodes and is allocated from a dynamic range (computed as server distribution port + 10000 through server distribution port + 10010). See networking guide for details.
  • 15672: HTTP API clients, management UI and rabbitmqadmin (only if the management plugin is enabled)
  • 61613, 61614: STOMP clients without and with TLS (only if the STOMP plugin is enabled)
  • 1883, 8883: (MQTT clients without and with TLS, if the MQTT plugin is enabled
  • 15674: STOMP-over-WebSockets clients (only if the Web STOMP plugin is enabled)
  • 15675: MQTT-over-WebSockets clients (only if the Web MQTT plugin is enabled)
  • 15692: Prometheus metrics (only if the Prometheus plugin is enabled)
1
2
3
firewall-cmd --query-port=5672/tcp
firewall-cmd --permanent --add-port=5672/tcp
firewall-cmd --reload

7、插件安装

1
2
[root@dn1 ~]# rabbitmq-plugins disable rabbitmq_management
[root@dn1 ~]# rabbitmq-plugins enable rabbitmq_management

8、配置优化

官方文档:https://www.rabbitmq.com/configure.html

​ rabbitmq的默认设置往往能够适应大多数开发或OA环境,但是对于生产环境来说还需要一定的优化。


8.1、配置文件

位置:https://www.rabbitmq.com/configure.html#config-file-location

1
2
3
4
node           : rabbit@example
home dir : /var/lib/rabbitmq
config file(s) : /etc/rabbitmq/advanced.config
: /etc/rabbitmq/rabbitmq.conf

如果不能确定你的配置文件的路径,查阅 log文件。或者在ManagerUI中查找

1
2
[root@dn1 rabbitmq]# find / -name rabbitmq.co*
/usr/share/doc/rabbitmq-server-3.7.24/rabbitmq.config.example

8.2、如何检查配置是否生效?

1
2
rabbitmqctl environment
rabbitmqctl [--node <node>] [--longnames] [--quiet] environment

8.3、新老配置文件格式

rabbitmq 3.7.0 之前格式 rabbitmq.config,使用erlang 配置格式

1
2
3
4
5
6
7
[
{rabbit, [{ssl_options, [{cacertfile, "/path/to/ca_certificate.pem"},
{certfile, "/path/to/server_certificate.pem"},
{keyfile, "/path/to/server_key.pem"},
{verify, verify_peer},
{fail_if_no_peer_cert, true}]}]}
].

rabbitmq 3.7.0 之后,推荐使用新的 sysctl格式

1
2
3
4
5
ssl_options.cacertfile           = /path/to/ca_certificate.pem
ssl_options.certfile = /path/to/server_certificate.pem
ssl_options.keyfile = /path/to/server_key.pem
ssl_options.verify = verify_peer
ssl_options.fail_if_no_peer_cert = true

8.4、rabbitmq-env.conf

样例

/usr/lib/rabbitmq/lib/rabbitmq_server-3.7.24/sbin/rabbitmq-defaults

配置

1
2
3
4
5
6
7
#!/bin/sh -e
# NODENAME=rabbit
CONFIG_FILE=/etc/rabbitmq/rabbitmq.conf
# ADVANCED_CONFIG_FILE=/etc/rabbitmq/advanced.config
# LOG_BASE=
# MNESIA_BASE=
RABBITMQ_SERVER_ADDITIONAL_ERL_ARGS="+A 24"

查看

1
rabbitmqctl environment

8.5、rabbitmq.conf

样例:https://github.com/rabbitmq/rabbitmq-server/blob/v3.7.x/docs/rabbitmq.conf.example

通过 rabbitmq-env.conf 来指定使用哪个配置文件,可以用来指定rabbitmq-dev.confrabbitmq-prod.conf

其实是 RABBITMQ_CONFIG_FILE 省略了前缀 RABBITMQ_,就变成了 CONFIG_FILE.


核心配置选项

1
2
3
4
5
6
7
8
9
10
11
12
13
14
15
16
17
18
19
20
21
22
23
24
25
26
27
28
29
30
31
32
33
34
35
36
37
38
39
40
41
42
43
44
45
46
47
48
49
50
51
52
53
54
55
56
57
58
59
60
61
listeners.tcp.default = 5672  # AMQP 对外服务端口
num_acceptors.tcp = 10 # 用来 accept tcp连接的 erlang 线程数
handshake_timeout = 10000 # AMQP 0-9-1 的 tcp握手超时时间
# listeners.ssl # 监听 tls加密的 AMQP 对外端口
# num_acceptors.ssl = 10 # 用来 accept tls连接的 erlang 线程数
# ssl_handshake_timeout = 5000 # AMQP 0-9-1 的 tls握手超时时间
ssl_options = none # 默认不启用 SSL

vm_memory_calculation_strategy = allocated # 内存使用报告的统计方式
vm_memory_high_watermark.relative = 0.6 # 触发流控的内存阈值比例[0.4~0.66]
# vm_memory_high_watermark.absolute = 2GB # 触发流控的内存阈值 绝对值
vm_memory_high_watermark_paging_ratio = 0.75 # 当内存水位线达到该百分比时,将消息持久化到硬盘 以释放内存,触发换页操作比例
# total_memory_available_override_value # 手动设置内存总量,而不是通过系统函数取,默认不设置

# 当空间小于50MB时触发流控机制
{disk_free_limit, 50000000},

log.file.level = info
# 与客户端协商最大帧大小
{frame_max,131072}
channel_max = 2047 # 最大信道个数
channel_operation_timeout = 15000 # 信道运行超时时间

max_message_size
heartbeat = 60 # 服务端和客户端心跳间隔,0表示禁用心跳

default_vhost = /
default_user = guest
default_pass = guest
default_user_tags.administrator = true
default_permissions.configure = .*
default_permissions.read = .*
default_permissions.write = .*

{loopback_users,[<<"guest">>]}, # 只能通过本地网络来访问broker的用户列表

cluster_formation.classic_config.nodes.1 = rabbit@hostname1
cluster_formation.classic_config.nodes.2 = rabbit@hostname2
collect_statistics = none
collect_statistics_interval = 5000
management_db_cache_multiplier = 5
auth_mechanisms.1 = PLAIN
auth_mechanisms.2 = AMQPLAIN
auth_backends.1 = internal
reverse_dns_lookups = false
delegate_count = 16

tcp_listen_options.backlog = 128
tcp_listen_options.nodelay = true
tcp_listen_options.linger.on = true
tcp_listen_options.linger.timeout = 0
tcp_listen_options.exit_on_close = false
hipe_compile = false # 即时编译,支持的平台可以提升CPU20%~50%的性能
cluster_partition_handling = ignore # 处理网络分区
cluster_keepalive_interval = 10000 # 向其他节点发送存活消息频率
queue_index_embed_msgs_below = 4096 # 消息的大小小于此值会直接嵌入到队列的索引中
mnesia_table_loading_retry_timeout = 30000
mnesia_table_loading_retry_limit = 10
mirroring_sync_batch_size = 4096
queue_master_locator = client-local # 创建队列时以什么策略判断坐落的broker节点
proxy_protocol = false

vi /etc/rabbitmq/rabbitmq.conf

1
2
3
4
5
6
7
8
9
10
11
12
13
14
15
listeners.tcp.default = 5672
tcp_listen_options.backlog = 2048
tcp_listen_options.nodelay = true
vm_memory_high_watermark.relative = 0.6
vm_memory_high_watermark_paging_ratio = 0.75
default_user = admin
default_pass = admin
hipe_compile = false
queue_master_locator = client-local
cluster_partition_handling = pause_minority

net_ticktime = 60

management.tcp.port = 15672
management.tcp.ip = 0.0.0.0
1
2
3
4
5
6
7
8
9
10
[root@dn1 rabbitmq]# chown rabbitmq:rabbitmq rabbitmq.conf
[root@dn1 rabbitmq]# chown rabbitmq:rabbitmq rabbitmq-env.conf
[root@dn1 rabbitmq]# chmod 666 rabbitmq-env.conf
[root@dn1 rabbitmq]# chmod 666 rabbitmq.conf

# 配置中遇到错误,查看原因

[root@dn1 ~]# service rabbitmq-server restart
[root@dn1 ~]# journalctl -xe
[root@dn1 ~]# rabbitmqctl cluster_status

8.6、advanced.config

样例:https://github.com/rabbitmq/rabbitmq-server/blob/master/docs/advanced.config.example

核心配置选项

1
2
3
4
5
6
7
8
{msg_store_index_module, rabbit_msg_store_ets_index}
{backing_queue_module, rabbit_variable_queue}
{msg_store_file_size_limit, 16777216}
{trace_vhosts, []}
{msg_store_credit_disc_bound, {4000, 800}}
{queue_index_max_journal_entries, 32768}
{lazy_queue_explicit_gc_run_operation_threshold, 1000}
{queue_explicit_gc_run_operation_threshold, 1000}

8.7、配置加密项


8.8、操作系统Kernel限制

1
2
3
4
5
6
7
8
9
10
11
12
13
14
15
16
17
18
19
20
21
22
23
24
25
26
27
# 永久更改最大打开文件描述符数
# 第一步
# vi /etc/security/limits.conf
* soft nofile 1000000
* hard nofile 1000000 #星号表示对所有用户生效

# 第二步
/usr/lib/systemd/system/rabbitmq-server.service
[Service]
LimitNOFILE=1000000

# 第三步
/etc/systemd/system/rabbitmq-server.service.d/limits.conf
[Service]
LimitNOFILE=1000000

# 第四步
systemctl daemon-reload
service rabbitmq-server start
reboot #重启系统

# 第五步(查看是否生效)
ulimit -n
# sysctl fs.file-max
#PID是应用的进程ID,在输出结果中查看"Max open files"的显示值
ps aux | grep rabbitmq
cat /proc/${rabbitmq-pid}/limits
1
2
3
4
5
6
7
8
9
10
11
12
13
14
15
16
17
18
19
20
21
[root@dn1 ~]# vi /etc/sysctl.conf
fs.file-max=1000000
net.core.somaxconn=65535
net.ipv4.tcp_max_syn_backlog=8192
net.ipv4.ip_local_port_range=32768 60999
net.ipv4.tcp_max_tw_buckets=20000

net.ipv4.conf.default.rp_filter=1

net.ipv4.tcp_timestamps=1
net.ipv4.tcp_tw_reuse=1
net.ipv4.tcp_tw_recycle=1
net.ipv4.tcp_fin_timeout=30
net.ipv4.tcp_keepalive_time=120
net.ipv4.tcp_keepalive_intvl=75
net.ipv4.tcp_keepalive_probes=4

net.ipv4.ip_nonlocal_bind=1
net.ipv4.ip_forward=1

[root@dn1 ~]# sysctl -p

8.9、生产环境检查

官方文档:https://www.rabbitmq.com/production-checklist.html


9、集群配置

为什么需要集群? 保证高可用

可以保证消息的万无一失吗?不能,队列跟消息存储在单一节点上。exchange和绑定可以复制。默认不会对队列中的消息进行复制。但可以解决

队列在及集群是如何存在的?默认不会复制

交换器在集群中如何存在的?会复制

集群中的节点有什么要求? 为了保障高可用,建议至少在集群中设置两个磁盘节点,其他为内存节点,提高集群的吞吐量

9.1、单机多节点集群

一台机器上,开不同端口

9.2、多机多节点集群

1、前提

  • 只能在内网使用,对网络非常敏感

  • 停止rabbitmq节点:/sbin/service rabbitmq-server stop

2、修改3台节点host文件

1
2
3
4
5
vi /etc/hosts

192.168.145.133 dn1
192.168.145.134 dn2
192.168.145.135 dn3
1
2
3
4
cat /var/lib/rabbitmq/.erlang.cookie

# 使用 node1 的 .erlang.cookie 覆盖其他所有节点的值
echo 'LLSFPZFATCBYBMCXMMAC' > /var/lib/rabbitmq/.erlang.cookie

4、配置集群

1、启动节点

1
service rabbitmq-server start

2、查看集群状态

1
rabbitmqctl cluster_status

3、将节点2,3加入集群

node2作为磁盘节点加入集群

1
2
3
4
5
6
7
8
9
10
11
12
13
14
15
16
17
[root@dn2 ~]# rabbitmqctl stop_app
Stopping rabbit application on node rabbit@dn2 ...
[root@dn2 ~]# rabbitmqctl reset
Resetting node rabbit@dn2 ...
[root@dn2 ~]# rabbitmqctl join_cluster rabbit@dn1
Clustering node rabbit@dn2 with rabbit@dn1
[root@dn2 ~]# rabbitmqctl start_app
Starting node rabbit@dn2 ...
completed with 0 plugins.
[root@dn2 ~]# rabbitmqctl cluster_status
Cluster status of node rabbit@dn2 ...
[{nodes,[{disc,[rabbit@dn1,rabbit@dn2]}]},
{running_nodes,[rabbit@dn1,rabbit@dn2]},
{cluster_name,<<"rabbit@dn1">>},
{partitions,[]},
{alarms,[{rabbit@dn1,[]},{rabbit@dn2,[]}]}]
[root@dn2 ~]#

node3 作为内存节点加入集群

1
2
3
4
5
6
7
8
9
10
11
12
13
14
15
16
17
[root@dn3 ~]# rabbitmqctl stop_app
Stopping rabbit application on node rabbit@dn3 ...
[root@dn3 ~]# rabbitmqctl reset
Resetting node rabbit@dn3 ...
[root@dn3 ~]# rabbitmqctl join_cluster rabbit@dn1 --ram
Clustering node rabbit@dn3 with rabbit@dn1
[root@dn3 ~]# rabbitmqctl start_app
Starting node rabbit@dn3 ...
completed with 0 plugins.
[root@dn3 ~]# rabbitmqctl cluster_status
Cluster status of node rabbit@dn3 ...
[{nodes,[{disc,[rabbit@dn2,rabbit@dn1]},{ram,[rabbit@dn3]}]},
{running_nodes,[rabbit@dn1,rabbit@dn2,rabbit@dn3]},
{cluster_name,<<"rabbit@dn1">>},
{partitions,[]},
{alarms,[{rabbit@dn1,[]},{rabbit@dn2,[]},{rabbit@dn3,[]}]}]
[root@dn3 ~]#

5、踢出单个节点

方法一:

1
2
3
4
5
[root@dn2 ~]# service rabbitmq-server stop
[root@dn3 ~]# service rabbitmq-server stop
[root@dn2 ~]# rabbitmqctl forget_cluster_node rabbit@dn3 --offline
[root@dn2 ~]# service rabbitmq-server start
[root@dn2 ~]# rabbitmqctl cluster_status

方法二:

1
2
3
[root@dn3 ~]# rabbitmqctl start_app
[root@dn3 ~]# rabbitmqctl reset
[root@dn3 ~]# rabbitmqctl start_app

问题解决:

1
2
3
4
5
6
7
8
2020-04-03 15:36:52.980 [error] <0.165.0> Mnesia(rabbit@dn2): ** ERROR ** (core dumped to file: "/var/lib/rabbitmq/MnesiaCore.rabbit@dn2_1585_899412_979927")
** FATAL ** Failed to merge schema: Bad cookie in table definition tracked_connection_per_vhost_on_node_rabbit@dn3: rabbit@dn2 = {cstruct,tracked_connection_per_vhost_on_node_rabbit@dn3,set,[rabbit@dn3],[],[],[],0,read_write,false,[],[],false,tracked_connection_per_vhost,[vhost,connection_count],[],[],[],{{1585491411119336579,-576460752303418047,1},rabbit@dn3},{{2,0},[]}}, rabbit@dn3 = {cstruct,tracked_connection_per_vhost_on_node_rabbit@dn3,set,[rabbit@dn3],[],[],[],0,read_write,false,[],[],false,tracked_connection_per_vhost,[vhost,connection_count],[],[],[],{{1585898870953098299,-576460752303421919,1},rabbit@dn3},{{2,0},[]}}

# 文件可能被修改了,恢复原状
/var/lib/rabbitmq/mnesia/rabbit\@dn2/cluster_nodes.config
[root@dn2 ~]# service rabbitmq-server stop
[root@dn3 ~]# service rabbitmq-server stop
[root@dn2 ~]# rabbitmqctl forget_cluster_node rabbit@dn3 --offline

6、异常处理

确保节点可以启动,即使它不是最后一个关闭的节点

1
rabbitmqctl force_boot

设置集群名称

1
2
3
rabbitmqctl set_cluster_name {name}
rabbitmqctl cluster_status
rabbitmqctl set_cluster_name rabbitmq_cluster_dev

修改集群节点的类型。在这个命令执行前需要停止RabbitMQ应用

1
2
3
rabbitmqctl stop_app
rabbitmqctl change_cluster_node_type {disc|ram}
rabbitmqctl start_app

10、负载均衡

10.1、使用HAProxy实现负载均衡

配置各个负载的内核参数

1
2
3
4
5
6
7
vim /etc/sysctl.conf
#开启允许绑定非本机的IP,haporxy启动忽视VIP存在
net.ipv4.ip_nonlocal_bind = 1
#内核是否转发数据包
net.ipv4.ip_forward = 1

sysctl -p

安装Haproxy

安装依赖包

1
yum install gcc openssl-devel readline-devel systemd-devel make pcre-devel -y
1
2
3
4
5
6
7
8
9
10
11
12
13
14
15
cd /data/soft/new/
wget https://github.com/lua/lua/archive/v5.3.5.tar.gz -O lua-5.3.5.tag.gz
tar xf lua-5.3.5.tag.gz
cd lua-5.3.5


wget https://github.com/haproxy/haproxy/archive/v1.9.0.tar.gz -O haproxy-1.9.0.tar.gz
tar -zxf haproxy-1.9.0.tar.gz
cd haproxy-1.9.0
pwd
# /data/soft/new/haproxy-1.9.0
make TARGET=linux2628 PREFIX=/usr/local/haproxy
make install PREFIX=/usr/local/haproxy

cp -r examples/errorfiles/ /usr/local/haproxy/
  • PREFIX 为指定的安装路径
  • TARGET则根据当前操作系统内核版本指定
    • - linux22 for Linux 2.2
    • - linux24 for Linux 2.4 and above (default)
    • - linux24e for Linux 2.4 with support for a working epoll (> 0.21)
    • - linux26 for Linux 2.6 and above
    • - linux2628 for Linux 2.6.28, 3.x, and above (enables splice and tproxy)

本文的操作系统内核版本为3.10.0,TARGET指定为 linux2628。

make TARGET=linux2628 USE_PCRE=1 USE_OPENSSL=1 USE_ZLIB=1

# # USE_PCRE=1 开启正则 USE_OPENSSL=1 开启openssl USE_ZLIB=1

# # USE_CPU_AFFINITY=1 为开启haproxy进程与CPU核心绑定,USE_SYSTEMD=1为支持使用 -Ws参数(systemd-aware master-worker 模式)启动Haproxy,从而实现单主进程多子进程运行模式。

配置Haproxy

1
2
3
4
5
6
7
8
9
10
11
12
13
14
15
16
17
18
19
20
21
22
23
24
25
26
27
28
29
30
31
32
33
34
35
36
37
38
39
mkdir /etc/haproxy

cat > /etc/haproxy/haproxy.cfg << EOF
global
log 127.0.0.1 local0 info
maxconn 4096
chroot /usr/local/haproxy
daemon
pidfile /run/haproxy.pid

defaults
log global
mode tcp
option tcplog
option dontlognull
retries 3
maxconn 1000000
timeout connect 5s
timeout client 120s
timeout server 120s

listen rabbitmq_cluster
bind 0.0.0.0:5671
mode tcp
balance roundrobin
server rmq_dn1 dn1:5672 check inter 5000 rise 2 fall 3 weight 1
server rmq_dn2 dn2:5672 check inter 5000 rise 2 fall 3 weight 1
server rmq_dn3 dn3:5672 check inter 5000 rise 2 fall 3 weight 1

listen rabbitmq_monitor
bind 0.0.0.0:8100
mode http
option httplog
stats enable
stats uri /stats
stats refresh 5s
EOF

$ haproxy -c -f /etc/haproxy/haproxy.cfg

日志配置

1
2
3
4
5
6
7
8
9
打开rsyslog配置:
vi /etc/rsyslog.conf
去掉下面两行前面的#号
$ModLoad imudp
$UDPServerRun 514
并添加下面一行
local0.* /var/log/haproxy.log
重启rsyslog
systemctl restart rsyslog

准备system启动脚本

1
2
3
4
5
6
7
8
cp /usr/local/haproxy/sbin/haproxy /usr/sbin/
\cp ./examples/haproxy.init /etc/init.d/haproxy

chmod 755 /etc/init.d/haproxy
useradd -r haproxy

chkconfig --add haproxy
systemctl daemon-reload
  1. 如果服务器安装后修改了hostname,出现了 unable to connect to epmd (port 4369) on bogon: nxdomain (non-existing domain) 这个问题,请看下是否 /etc/hosts 文件、/etc/hostname文件和环境变量$HOSTNAME 是否一致。

  2. 如果启动HAProxy出现 /etc/rc.d/init.d/haproxy: line 26: [: =: unary operator expected 这个错误,修改/etc/init.d/haproxy 文件的26行 [ ${NETWORKING} = “no” ] && exit 0 为 [ “${NETWORKING}” = “no” ] && exit 0

启动haproxy

1
2
3
4
5
6
7
8
9
10
11
12
13
14
15
16
17
18
19
20
21
22
23
24
25
26
27
28
29
# 检查配置文件语法
haproxy -c -f /etc/haproxy/haproxy.cfg

# 以daemon模式启动,以systemd管理的daemon模式启动
haproxy -D -f /etc/haproxy/haproxy.cfg [-p /var/run/haproxy.pid]
haproxy -Ds -f /etc/haproxy/haproxy.cfg [-p /var/run/haproxy.pid]

# 启动调试功能,将显示所有连接和处理信息在屏幕
haproxy -d -f /etc/haproxy/haproxy.cfg

# restart。需要使用st选项指定pid列表
haproxy -f /etc/haproxy.cfg [-p /var/run/haproxy.pid] -st `cat /var/run/haproxy.pid`

# graceful restart,即reload。需要使用sf选项指定pid列表
haproxy -f /etc/haproxy.cfg [-p /var/run/haproxy.pid] -sf `cat /var/run/haproxy.pid`
# 显示haproxy编译和启动信息
haproxy -vv


systemctl start haproxy.service
systemctl stop haproxy.service
systemctl status haproxy.service -l

haproxy {start|stop|restart|reload|condrestart|status|check}
service haproxy reload
service haproxy stop
service haproxy check
service haproxy status
service haproxy start

开机启动

1
/sbin/chkconfig haproxy on

安装keepalived

官网:https://www.keepalived.org/download.html

下载安装

1
2
3
4
5
6
7
8
9
10
11
cd /data/soft/new
wget https://www.keepalived.org/software/keepalived-1.4.5.tar.gz
tar -zxf keepalived-1.4.5.tar.gz
cd keepalived-1.4.5

[root@dn1 keepalived-1.4.5]# yum -y install libnl libnl-devel
[root@dn1 keepalived-1.4.5]# yum install -y libnfnetlink-devel

[root@dn1 keepalived-1.4.5]# ./configure --prefix=/usr/local/keepalived --with-init=SYSV
[root@dn1 keepalived-1.4.5]# make
[root@dn1 keepalived-1.4.5]# make install

配置系统服务

1
2
3
4
5
6
7
8
9
[root@dn1 keepalived-1.4.5]# cd ~
[root@dn1 ~]# cp /usr/local/keepalived/etc/rc.d/init.d/keepalived /etc/init.d/
[root@dn1 ~]# cp /usr/local/keepalived/etc/sysconfig/keepalived /etc/sysconfig
[root@dn1 ~]# cp /usr/local/keepalived/sbin/keepalived /usr/sbin/
[root@dn1 ~]# chmod +x /etc/init.d/keepalived
[root@dn1 ~]# chkconfig --add keepalived
[root@dn1 ~]# chkconfig keepalived on
[root@dn1 ~]# mkdir -p /etc/keepalived
[root@dn1 ~]# cp /usr/local/keepalived/etc/keepalived/keepalived.conf /etc/keepalived/

配置keepalived

1
2
3
4
5
6
7
8
9
10
11
12
13
14
15
16
17
18
19
20
21
22
23
24
25
26
27
28
29
30
31
32
33
34
35
36
37
38
39
40
41
42
43
44
45
46
47
48
49
50
51
52
53
54
55
56
57
58
59
60
61
62
63
64
65
66
67
68
69
70
71
72
73
[root@dn1 ~]# vi /etc/keepalived/check_haproxy.sh
#!/bin/bash
if [ $(ps -C haproxy --no-header | wc -l) -eq 0 ];then
/usr/sbin/haproxy -D -f /etc/haproxy/haproxy.cfg -p /var/run/haproxy.pid
fi
sleep 2
if [ $(ps -C haproxy --no-header | wc -l) -eq 0 ];then
service keepalived stop
fi
[root@dn1 ~]# chmod +x /etc/keepalived/check_haproxy.sh

[root@dn1 ~]# > /etc/keepalived/keepalived.conf
[root@dn1 ~]# vim /etc/keepalived/keepalived.conf
global_defs {
router_id node1
script_user root
enable_script_security
}
vrrp_script chk_haproxy {
script "/etc/keepalived/check_haproxy.sh"
interval 5
weight 2
}
vrrp_instance VI_1 {
state MASTER
interface eth0
virtual_router_id 1
priority 100
advert_int 1
unicast_src_ip 192.168.145.13
unicast_peer {
192.168.145.13
192.168.145.13
}
authentication {
auth_type PASS
auth_pass root1111
}
track_script {
chk_haproxy
}
virtual_ipaddress {
192.168.145.200
}
}
[root@dn2 ~]# vim /etc/keepalived/keepalived.conf
global_defs {
router_id node2 # 每个节点必须不一样
script_user root
enable_script_security
}
vrrp_script chk_haproxy {
script "/etc/keepalived/check_haproxy.sh"
interval 5
weight 2
}
vrrp_instance VI_1 {
state BACKUP
interface eth0 # 根据情况变换
virtual_router_id 1
priority 90 # 每个节点必须不一样
advert_int 1
authentication {
auth_type PASS
auth_pass root1111
}
track_script {
chk_haproxy
}
virtual_ipaddress {
192.168.145.200
}
}

启动

1
2
3
4
service keepalived start && systemctl status keepalived.service -l
service keepalived stop
service keepalived status
service keepalived restart && systemctl status keepalived.service -l
1
[root@dn1 ~]# ip add show


11、性能测试

11.1、RabbitMQ PerfTest

PerfTest 是一个基于Java的吞吐量测试工具

1)、下载安装

1
2
3
4
# 文档
https://rabbitmq.github.io/rabbitmq-perf-test/snapshot/htmlsingle/
# 下载地址
https://github.com/rabbitmq/rabbitmq-perf-test/releases
1
2
3
4
5
cd /data/message-queue/rabbitmq
wget https://github.com/rabbitmq/rabbitmq-perf-test/releases/download/v2.11.0/rabbitmq-perf-test-2.11.0-bin.tar.gz
tar -zxf rabbitmq-perf-test-2.11.0-bin.tar.gz
cd rabbitmq-perf-test-2.11.0/bin
./runjava com.rabbitmq.perf.PerfTest --help

2)、开始压测

单压各个节点

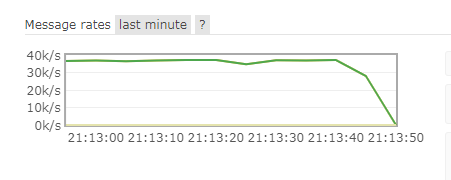
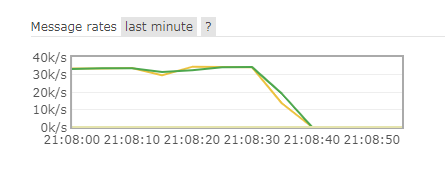
1-p, 2-c:发现内存节点和磁盘节点差距不大,应该是消费速度足够快,不需要落到磁盘上

1
2
3
4
5
6
7
8
cd /data/message-queue/rabbitmq/rabbitmq-perf-test-2.11.0/bin

# 单压内存节点
./runjava com.rabbitmq.perf.PerfTest -h amqp://admin:admin@192.168.145.135:5672 -x 1 -y 2 -u "throughput-test-1" -a --id "test 1"

# 结果
id: test 1, sending rate avg: 36934 msg/s
id: test 1, receiving rate avg: 36607 msg/s

1
2
3
4
5
6
7
8
9
10
11
12
13
14
15
16
17
18
19
20
21
22
23
24
25
./runjava com.rabbitmq.perf.PerfTest -h amqp://admin:admin@192.168.145.135:5672 -x 5 -y 10 -u "throughput-test-2" -a --id "test 2"

./runjava com.rabbitmq.perf.PerfTest -h amqp://admin:admin@192.168.145.135:5672 -x 1 -y 2 -u "throughput-test-3" --id "test 3"

./runjava com.rabbitmq.perf.PerfTest -h amqp://admin:admin@192.168.145.135:5672 -x 1 -y 2 -u "throughput-test-4" --id "test 4" -s 4000

./runjava com.rabbitmq.perf.PerfTest -h amqp://admin:admin@192.168.145.135:5672 -x 1 -y 2 -u "throughput-test-5" --id "test-5" -f persistent

./runjava com.rabbitmq.perf.PerfTest -h amqp://admin:admin@192.168.145.135:5672 -x 1 -y 2 -u "throughput-test-6" --id "test-6" -f persistent --multi-ack-every 100

./runjava com.rabbitmq.perf.PerfTest -h amqp://admin:admin@192.168.145.135:5672 -x 1 -y 2 -u "throughput-test-7" --id "test-7" -f persistent --multi-ack-every 200 -q 500

./runjava com.rabbitmq.perf.PerfTest -h amqp://admin:admin@192.168.145.135:5672 -x 1 -y 2 -u "throughput-test-8" --id "test-8" -f persistent -q 500 -c 500

./runjava com.rabbitmq.perf.PerfTest -h amqp://admin:admin@192.168.145.135:5672 -x 1 -y 2 -u "throughput-test-10" --id "test-10" -f persistent -q 500 -pmessages 100000

./runjava com.rabbitmq.perf.PerfTest -h amqp://admin:admin@192.168.145.135:5672 -x 1 -y 2 -u "throughput-test-11" --id "test-11" -f persistent -q 500 --rate 5000

./runjava com.rabbitmq.perf.PerfTest -h amqp://admin:admin@192.168.145.135:5672 -x 1 -y 2 -u "throughput-test-12" --id "test-12" -f persistent --rate 5000 --consumer-rate 2000

./runjava com.rabbitmq.perf.PerfTest -h amqp://admin:admin@192.168.145.135:5672 -x 1 -y 2 -u "throughput-test-13" --id "test-13" -f persistent -z 30

./runjava com.rabbitmq.perf.PerfTest -h amqp://admin:admin@192.168.145.135:5672 -y0 -p -u "throughput-test-14" -s 1000 -C 1000000 --id "test-14" -f persistent

./runjava com.rabbitmq.perf.PerfTest -h amqp://admin:admin@192.168.145.135:5672 -x0 -y10 -p -u "throughput-test-14" --id "test-15"

1

1
2
3
4
5
6
7
# 压整个集群
# 1个生产者,2个消费者,使用队列 throughput-test-1,自动确认
./runjava com.rabbitmq.perf.PerfTest -h amqp://admin:admin@192.168.145.200:5671 -x 1 -y 2 -u "throughput-test-1" -a --id "test 1"

# 结果:
id: test 1, sending rate avg: 30106 msg/s
id: test 1, receiving rate avg: 29751 msg/s

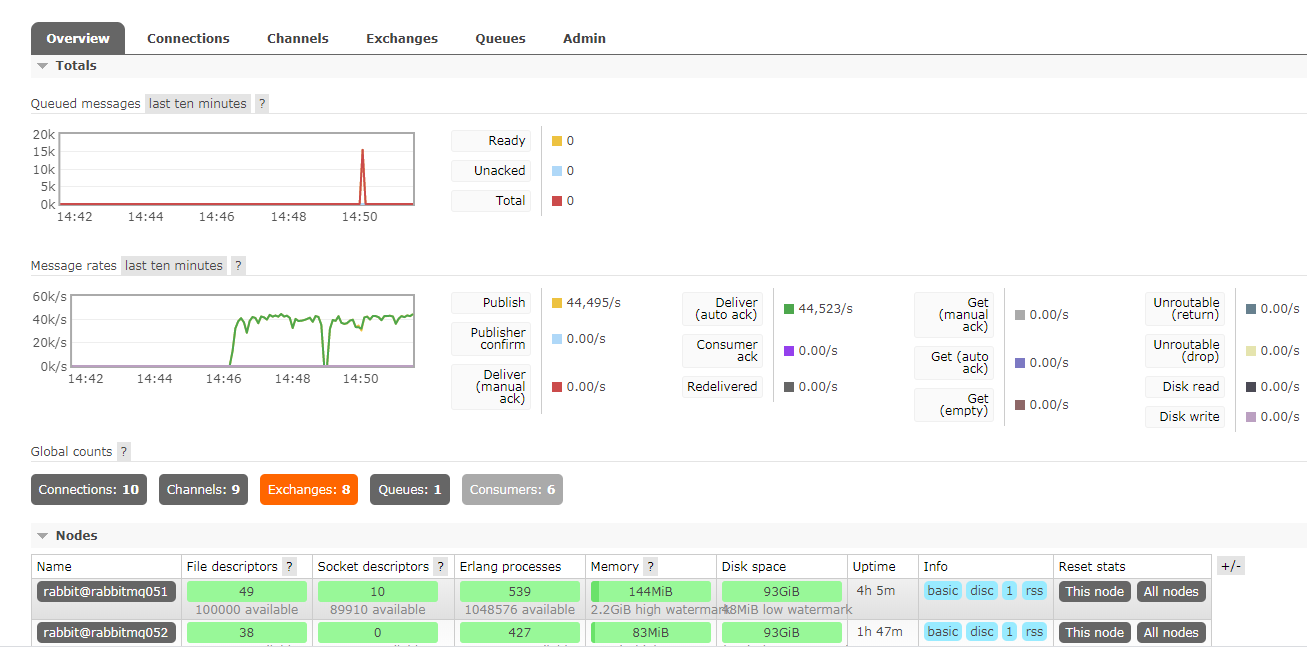
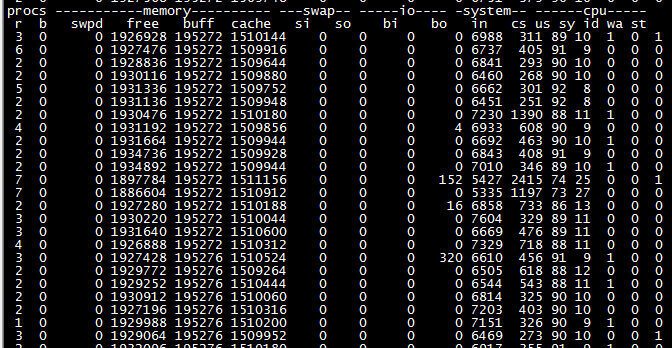
使用vmstat 观察到cpu不够用,加cpu以后,效率直线上升

1
2
3
netstat -tan |grep ^tcp |awk '{++a[$6]} END{for (i in a) print i, a[i]}'
netstat -s | grep reject
netstat -s | grep TCPBacklogDrop